Outline & Headings
Commands that restructure or re-level a subtree. All three share the same H1–H6 heading detection.
Restructure Outline by Headings
Re-nests a flat or mis-pasted document so that paragraphs and lower-level headings sit under their preceding higher-level heading. Built for the common case of pasting structured web content (with H1/H2/H3 headers) into RemNote, which often arrives either as a flat list of siblings or with mis-indented nesting (e.g. an H2 ending up under a paragraph instead of under its H1).
How to invoke
Run Restructure Outline by Headings (quick code roh) with one of the following selections:
- Single rem selected → operates on all descendants of that rem. The selected rem stays in place as the container root.
- Multiple rems selected (Shift+click in the outline) → operates on the selected rems plus all their descendants. The restructured subtree slots back into the selection's original position, preserving unselected sibling rems above and below it.
- No selection / cursor inside a rem → falls back to the focused rem and operates on its descendants (same as single-rem case).
The command is also fully Omnibar-friendly: press Cmd+/ → search roh → Enter, and the selection you had before opening the palette is preserved (see Omnibar Selection Recovery).
Preview popup
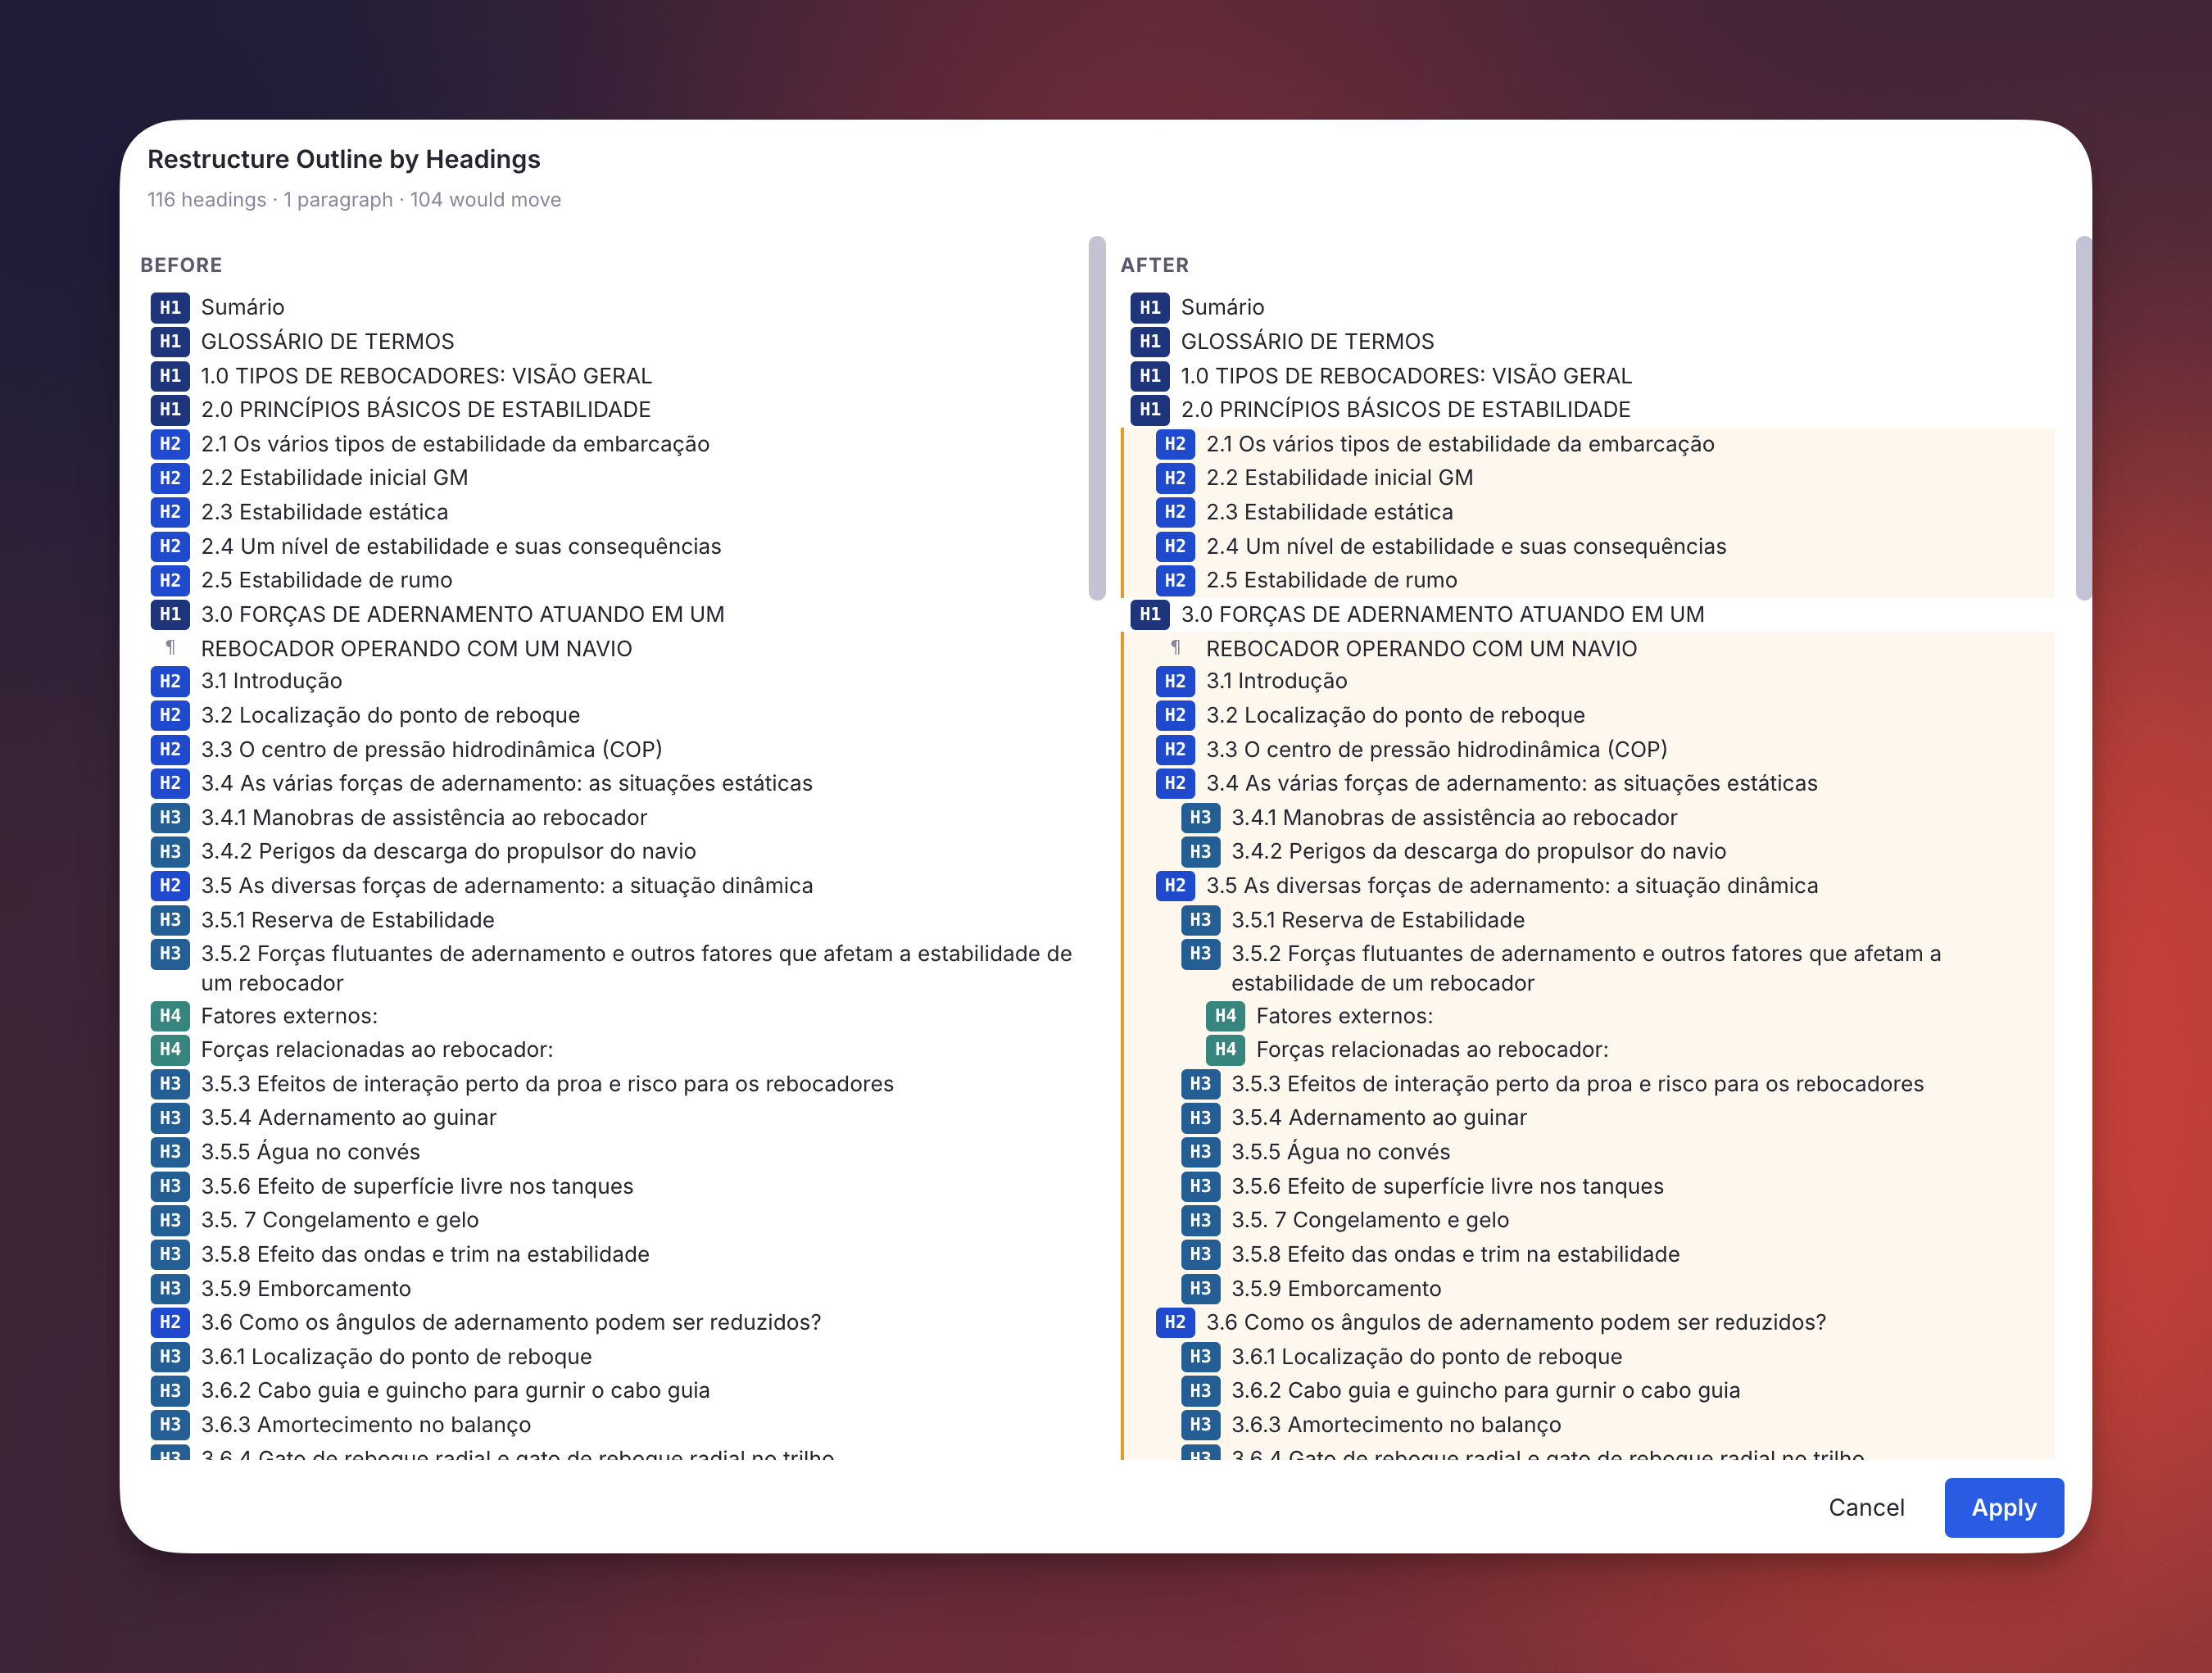
A side-by-side popup opens before any change is applied:
- Left panel (Before): the current state of the selected subtree, exactly as it appears in RemNote.
- Right panel (After): the proposed restructured tree. Each row that would move is marked with an amber left-border and tinted background so you can scan at a glance what's changing.
Each rem row is labelled with a colored heading badge (H1 through H6) or a ¶ paragraph marker. The status bar at the top reports counts: "N headings · M paragraphs · K would move".
Per-rem Preserve / Flatten toggle
Non-heading rems that already have children (lists, sub-paragraphs, etc.) get an inline button in the After panel:
- ⏷ Preserve (default) — the rem keeps its existing children as an opaque subtree; they move with it when re-nested under a heading. Use this for legitimate nested content (e.g. bullet-list items that belong together).
- ⏵ Flatten — the rem's children are pulled into the candidate flow as independent items and get re-organized by the heading rules along with everything else. Use this for mis-pasted nesting where children ended up under a non-heading rem by accident.
Toggling this button re-runs the algorithm and re-renders the After tree in place, so you can experiment before committing.
Apply / Cancel
- Apply (bottom-right): runs the reparenting and captures an undo snapshot.
- Cancel (or close the popup): no changes are made.
Algorithm
The restructure walks the candidate list in document order and tracks a heading stack:
- The smallest heading level present (e.g.
H2if there is noH1) becomes the implicit "top" — selections that don't start atH1are not broken. - Each heading
Hnpops the stack until the top has a strictly lower level, then becomes a child of that heading (or the container root if the stack is empty), and is pushed onto the stack. - Each paragraph attaches to whatever heading is currently on top of the stack (or the container root if no heading has been seen yet — "orphan paragraphs" before the first heading remain at the top level).
- Heading level skips are handled: an
H1 → H3jump (noH2between) nests theH3directly under theH1.
Heading levels supported
All six RemNote heading levels are recognized: H1, H2, H3, H4, H5, H6.
Undo
After applying, an Outline Restructured notification appears in the sidebar (left side, in the SidebarEnd region) with the affected scope name, the count of moved rems, and a red Undo Restructure button.
- The Undo button restores every moved rem to its exact prior parent and position.
- The notification stays visible until you click Undo or dismiss it with
✕. - A second invocation is available as a command:
Revert Last Outline Restructure(quick coderolr) — identical effect, same single snapshot slot.
The snapshot is session-scoped and single-slot: starting a new restructure overwrites the previous undo. (Multi-step undo isn't supported; for that, rely on RemNote's native history.)
Edge cases
- No headings in the scope → the command shows the popup with an explanatory message ("no changes — no headings to anchor on") and disables the Apply button.
- Powerup property rems (e.g. the auto-created
Sizerem RemNote attaches to every heading) are filtered out from both the walk and the preview, so they don't clutter the tree and aren't accidentally moved. - Portals, references, queries are treated as opaque paragraph candidates: they never get restructured internally and never get flattened.
Set Next Heading Level
Styles the selected rem(s) as one heading level deeper than their parent — a quick way to keep an outline's heading hierarchy consistent as you add content under an existing heading, without manually picking H1…H6 each time. If the parent is an H3, the selected rem becomes an H4; under an H4 it becomes H5, and so on, clamped at the deepest level RemNote supports.
It reuses the same heading detection and application logic as Restructure Outline by Headings, so it understands the full H1–H6 range — including H4/H5/H6, which RemNote stores in the Header powerup's Size slot rather than the H1–H3 font-size API.
Invocation
Run Set Next Heading Level (quick code hn) with one of the following:
- One or more whole rems selected in the outline (Shift+click) → each selected rem is styled relative to its own parent.
- Cursor inside a rem (text selection or collapsed caret) → operates on that rem.
- No selection → falls back to the focused rem.
Like the other outline commands, it's Omnibar-friendly: Cmd+/ → search hn → Enter preserves the multi-rem selection you had before opening the palette (see Omnibar Selection Recovery).
Behavior
For each target rem, the command looks at its parent's heading level:
- Parent is a heading
Hn→ the rem is set toH(n+1). (AnH6parent keeps the child atH6— there's noH7.) - Parent is not a heading → see Grandparent fallback below.
- Neither parent nor grandparent is a heading (or the rem is top-level with no parent) → the rem is skipped, and a toast reports how many were skipped for lack of an ancestor heading.
Grandparent fallback
If the immediate parent isn't a heading but the grandparent is, the command can't simply nest one level under a non-heading. Instead it offers to fix both levels at once via a confirmation dialog:
- Cancel → nothing changes.
- OK → the parent is promoted to
H(n+1)and the selected rem toH(n+2), whereHnis the grandparent's level.
Example. Grandparent is
H2, parent is plain text, selected rem is plain text → on confirm, the parent becomesH3and the selected rem becomesH4.
Multi-rem selections
When several rems are selected at once:
- Each rem with a heading parent is styled immediately (direct case).
- All grandparent-fallback cases are gathered and covered by a single confirmation dialog (not one prompt per rem). On confirm, every affected rem and its parent is styled; a parent shared by several selected siblings is promoted only once.
Notes & edge cases
- H4–H6 are fully supported on both detection and application — the command writes the deeper levels through the Header powerup's
Sizeslot, exactly as RemNote does internally. - Heading styling never aborts on a single failure: if applying a level throws, the command logs a warning and continues with the rest of the batch.
- A toast summarizes the result, e.g. "Set heading on 3 rem(s). 1 skipped (no ancestor heading)."
Apply Heading Levels by Hierarchy (Table of Contents)
Turns a ready-made outline into a properly-leveled table of contents in one shot: select the rems and the command assigns heading levels (H1–H6) according to each rem's depth in the hierarchy, to a level range you choose (e.g. H1–H3, or H2–H4). Built for the moment when you've drafted the structure of a document as plain bullets and want it to look like a structured document without setting every heading by hand.
It shares its heading detection/application (and so the full H1–H6 range, including the H4/H5/H6 levels RemNote keeps in the Header powerup's Size slot) with Restructure Outline by Headings and Set Next Heading Level. Unlike Restructure, it never moves rems — it only changes their heading level.
Invoking the ToC command
Run Apply Heading Levels by Hierarchy (Table of Contents) (quick code htoc) with the outline rems selected:
- Select the outline's rems (Shift+click) — typically the whole subtree you want leveled. The selection is reduced to its forest roots (the topmost selected rems), which become the top level; everything beneath them is leveled by depth. Selecting a parent and its descendants is fine — the descendants aren't double-counted.
- Single rem / cursor inside a rem — that rem becomes the top level and its descendants are leveled beneath it.
- Omnibar-friendly (
Cmd+/→htoc), preserving the multi-rem selection (see Omnibar Selection Recovery).
Depth → level mapping
You pick two bounds in the preview: a Top level and a Deepest level.
- The topmost selected rems get the Top level (e.g.
H1). - Each level deeper adds one (
H2,H3, …), up to the Deepest level. - Rems nested deeper than the range keep their current level — they're left untouched, not forced into a heading or stripped.
Example (Top = H1, Deepest = H3).
CAPÍTULO 1→H1, its1.1child →H2, the1.1.1grandchild →H3. Anything below that depth is left as-is.
Promote / Demote (shift one level)
Two companion commands shift the heading level of the selected subtree by one step. Because RemNote's outline selection reports only the top-level rems of a subtree, these (like the ToC command) walk the whole selected subtree and shift every heading within it; non-heading rems inside the subtree are left untouched (there's nothing to shift):
Demote Heading Level (one level deeper)(quickhdmt) —H2 → H3(bigger H number, visually smaller).Promote Heading Level (one level shallower)(quickhpmt) —H2 → H1.
Levels are clamped to H1–H6. These open the same preview as the ToC command.
Preview & apply
Both flows open a side-by-side Before | After popup before anything changes:
- Before shows each rem with its current level badge (
H1–H6, or¶for a paragraph). - After shows the proposed result; rows whose level changes are marked with an amber border and an
old → newbadge transition. - The ToC variant adds Top level / Deepest level dropdowns that re-derive the preview live. The status bar reports "N of M rems would change".
- Apply commits the level changes; Cancel (or closing the popup) makes none. Apply is disabled when nothing would change.
Undo (heading levels)
After applying, a Heading Levels Applied banner appears in the sidebar (SidebarEnd) with the count of changed rems and a red Undo Heading Changes button that restores every rem's prior level (including reverting rems back to plain paragraphs). It uses its own snapshot slot, separate from the Restructure undo, so the two banners never clobber each other. The same revert is available as the Revert Last Heading Level Change command (quick code rlh). Single-slot and session-scoped: a new apply overwrites the previous undo.
Notes (heading levels)
- Full H1–H6, on both detection and application — deeper levels are written through the Header powerup's
Sizeslot, exactly as RemNote does internally. - Never reparents. Only the heading level changes; the outline's structure (parents, positions) is untouched.
- The quick code is
htoc(nottoc, which is RemNote's built-in Table of Contents reference).